RedSleeve on a Raspberry Pi

I’ve got an updated version of RedSleeve Linux ( http://www.redsleeve.org/ ) running on the Raspberry Pi. RedSleeve Linux is an arm port of an OS like Centos :). This latest update now comes in two versions, one a basic command line setup while the other has a basic desktop available.

Note: it has been reported that these images do not work on the V2 Pi boards.

As I don’t have one to test I suggest you try the alternative install method as outlined on the RedSleeve Wiki Page – http://wiki.redsleeve.org/index.php/Install_Rasperry_Pi

redsleeve_desktop

The way this was achieved was to take one of the current Raspberry Pi Debian images and replace the main partition from the rootfs currently available on the RedSleeve site.

To simplify the process I have prepared a couple of 2Gb card images that can get you started.

They both contain a user account for ‘pi’ password ‘raspberry’ and the root account has a password of ‘redsleeve’. They will connect to a network using DHCP.

Once logged in as ‘pi’ simply type ‘startx’ to fire up the desktop if you’re using the desktop version. It is optimised for using a monitor – if you use a TV and have overscan issues you need to edit /boot/config.txt and alter the line ‘disable_overscan=1’ to ‘disable_overscan=0’ and reboot.

To use the desktop image (in linux) type:

#dd if=/source_directory/raspi-redsleeve-gui-0.3.1.img.gz conv=noerror,sync bs=8M | gzip -dcf | dd of=/dev/sdf bs=8M

Alter your source directory and SD card location (/dev/sdf) to suit. Be very careful to set the SD card location correctly, otherwise you could destroy a hard disk! Type ‘dmesg’ and you should see the SD card location at the end of the listing, if it was the last thing you plugged in.

Alternatively you can use the fedora-arm-installer available here:

http://fedoraproject.org/wiki/Fedora_ARM_Installer

You can download the images from here:

raspi-redsleeve-cli-0.3.img.gz – 318Mb – Command Line version

raspi-redsleeve-gui-0.3.1.img.gz – 537Mb – Desktop version

There are also a ‘xz’ compressed versions if you can handle that – it contains the same images as above.

raspi-redsleeve-cli-0.3.img.xz – 226Mb – Command Line version

raspi-redsleeve-gui-0.3.1.img.xz – 359Mb – Desktop version

2Gb is a bit limiting, but you can use gparted to resize the ext4 partition up to whatever your SD card will accommodate.

Now you can use yum to install all the stuff you want.

Changes from 0.3 to 0.3.1

  • Fixed initial eth0 initialisation in gui image – again – sorry

Changes from 0.2 to 0.3 include:

  • Image size fixed so that it fits all 2Gb cards
  • Size reduction on CLI version to reduce download size
  • Raspberry Pi kernel/firmware updated to latest 11/6/2012

Changes from the 0.1 to 0.2 include:

  • Fixed initial eth0 initialisation
  • Added desktop version
  • Fixed /etc/fstab
  • Included /usr/bin/rpi-update
  • Improved logging
  • Set Language
  • Set Timezone
  • Set Keyboard
  • Initialised Sound module
  • Initialised time setting for Raspberry Pi’s lack of RTC
Posted in Software | Tagged , , , | 6 Comments

rpi-update under RedSleeve linux

It is possible to run the utility rpi-update (from here: https://github.com/Hexxeh/rpi-update) directly on RedSleeve Linux on a Raspberry Pi.

First you need to mount the boot partition in the running system. RedSleeve already has a /boot directory but it only contains an unused splash image.

mv /boot /boot-orig
mkdir /boot

Check your device names use:

fdisk -l

Mine were /dev/mmcblk0p1 and /dev/mmcblk0p2

mount /dev/mmcblk0p1 /boot

This should then allow you to see the true boot partition which will look like this:


ls -l /boot
total 34433
-rwxr-xr-x 1 root root 2047272 Jun 1 14:15 arm128_start.elf
-rwxr-xr-x 1 root root 2047272 Jun 1 14:15 arm192_start.elf
-rwxr-xr-x 1 root root 2047272 Jun 1 14:15 arm224_start.elf
-rwxr-xr-x 1 root root 273 Apr 19 08:58 boot_enable_ssh.rc
-rwxr-xr-x 1 root root 16528 Jun 1 14:15 bootcode.bin
-rwxr-xr-x 1 root root 124 Apr 19 08:58 cmdline.txt
-rwxr-xr-x 1 root root 26 Apr 19 08:58 issue.txt
-rwxr-xr-x 1 root root 4195844 Jun 1 14:15 kernel.img
-rwxr-xr-x 1 root root 6194612 Jun 1 14:15 kernel_debug.img
-rwxr-xr-x 1 root root 16344532 Jun 1 14:15 kernel_emergency.img
-rwxr-xr-x 1 root root 314691 Jun 1 14:15 loader.bin
-rwxr-xr-x 1 root root 2047272 Jun 1 14:16 start.elf

You can then edit your /etc/fstab if you wish to have this mounted each time you boot. My /etc/fstab looks like this:


/dev/mmcblk0p2 / ext4 noatime 1 1
/dev/mmcblk0p1 /boot vfat noatime 1 2
devpts /dev/pts devpts gid=5,mode=620 0 0
tmpfs /dev/shm tmpfs defaults 0 0
proc /proc proc defaults 0 0
sysfs /sys sysfs defaults 0 0

Now we need some items installed using yum:

yum install wget git diffutils

Now get the rpi-update util and make it executable:

wget http://goo.gl/1BOfJ -O /usr/bin/rpi-update
chmod +x /usr/bin/rpi-update

Now simply run:

rpi-update

Reboot and your on the latest RaspberryPi kernel code.

Posted in Software | Tagged , , , , | Leave a comment

Refurbish the battery on an HP P410 BBWC

HP Proliant servers that use the P410 Smartarray controller use batteries that are supposed to last around 3 years, but on some hardware that’s getting on a bit now, they are a serious concern, as they still cost about £60 each or £120 if you buy them from HP. And everyone knows a P410 without Battery Backed Write Cache (BBWC) is seriously compromised!

So here is our cheapskates way around futureproofing our older Proliant DL385’s.

Prise open the old battery casing and toss out the old cells, wire in a new lead to some standard Ni-MH AAA cells, and your ready to go… OK, some pictures might help :)

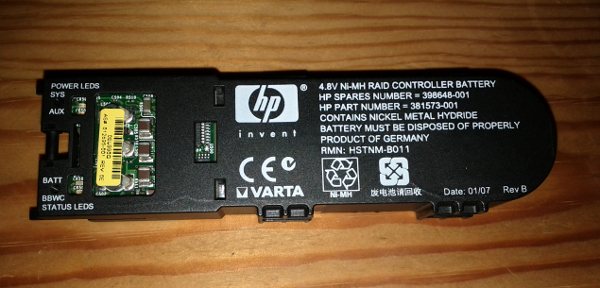
Below then is the item were discussing – its HP part number is 381573-001 or 398648-001 or one of the other vast number of variants, they may have slightly different power ratings, the important one for us is 4.8V Ni-MH, that tells us there are 4 cells internally.

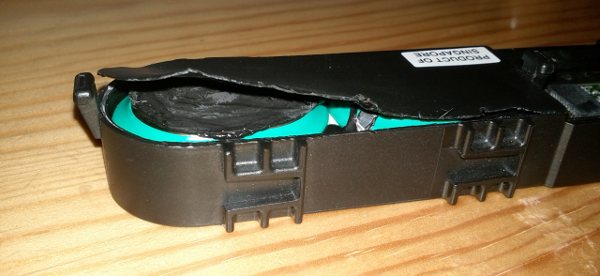
At first appearance the block is sealed and there is no obvious way to get to the cells, in fact its glued together and covered with a thin plastic sheet. Our first task is to force our way into the cell compartment and remove the plastic lid, this is where it gets destructive, don’t proceed unless you have no further use for the battery pack!

Prise a small screwdriver into the edge of the plastic, until you’ve made a hole and then trace around the edge to reveal the cells, but be careful not to go to far in or puncture the cells or insulation. Starting in the middle of the long sides is a good place as shown above.

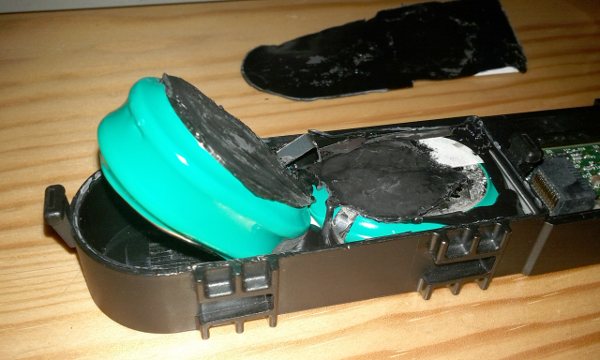
The cells are held in with silicone gunk and double sided tape so its fairly easy to prise the lid off and the cells out of their home.

Take care with the cells as they could still have some power in them, even if the server disagrees! Lever them out until they are just attached with the leads to the small PCB.

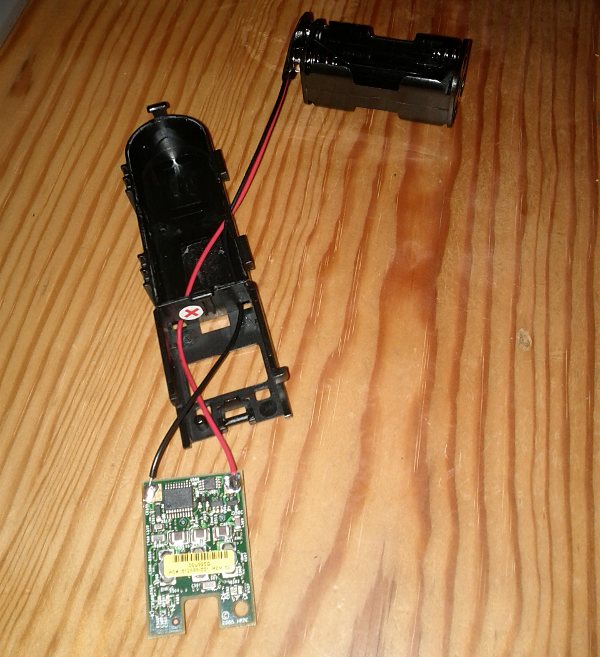
The PCB simply unclips from the small cutout in the middle. Pull this clear and you can see the battery is just held against two gold plated pads. Now the cells can be removed from the case. The original cells we had were Varta V500HT 500mAh cells which are standard Ni-MH 1.2V cells attached 4 in series. We now purchased a small AAA battery holder for 4 cells and a PP3 style clip with flying leads (all from Maplin if you have one handy). A small 3mm hole was drilled in the side of the old cell holder to feed the wires in and through to where the PCB fits. Note in the picture below, the ‘+’ symbol adjacent to the red wire, this is important to get right! Simply solder the new battery leads to the gold plated pads.

The small PCB is inverted above which is why the wires are crossed. Now you can reassemble the small board in its holder again, and it should end up looking like the assembly below. Note again the red wire by the ‘+’ sign.

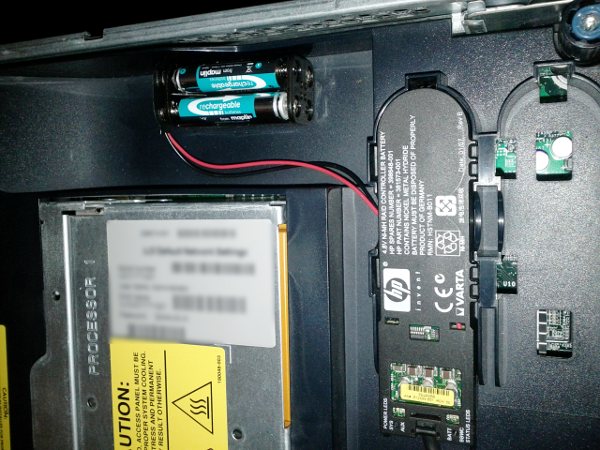
Finally reassemble into the server, the extra battery pack found a neat little hollow in our DL385, your solution may need to adapt to the different servers that these packs are used in. We put a small amount of Velcro under the battery pack just to keep it in place. The cells  used were own brand Maplin NiMH cells rated at 1000mAh. Don’t go too crazy in cell capacity as the charging current is limited by the control board. Total cost is around £6 per server, if you’ve got a number of servers this is very welcome!

Restart the server and it should take 2-3 hours of recharging before your cache comes back online.

Don’t forget to dispose of the old NiMH cells properly, most supermarkets seem to collect them now.

The neat little utility hpacucli now gives us this status:

 Post Prompt Timeout: 0 secs
 Cache Board Present: True
 Cache Status: OK
 Accelerator Ratio: 25% Read / 75% Write
 Drive Write Cache: Enabled
 Total Cache Size: 512 MB
 No-Battery Write Cache: Disabled
 Cache Backup Power Source: Batteries
 Battery/Capacitor Count: 1
 Battery/Capacitor Status: OK


Posted in Hardware | Tagged , , | 56 Comments